
Kingshot Swordland Showdown: coordinate captures, garrisons and dropped points
Use official map rules and one alliance’s player-led plan to assign objectives, mobile support and point collection.
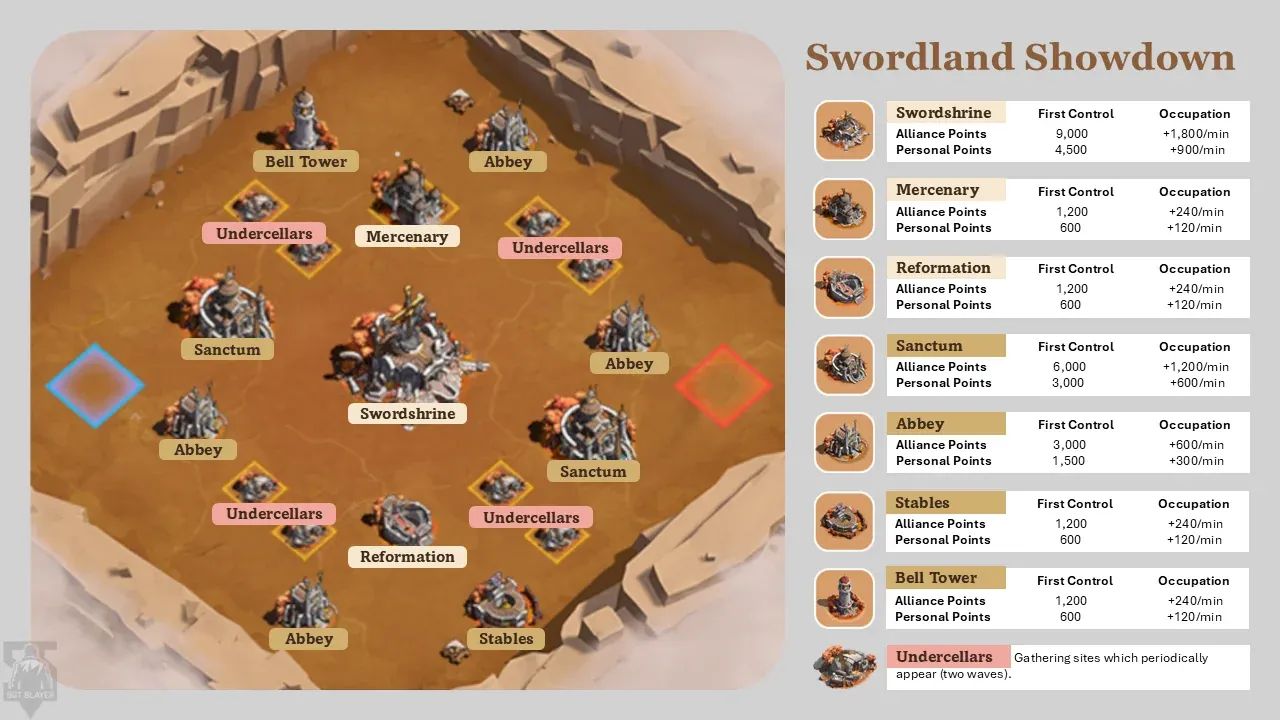
In Swordland Showdown, your alliance has more to manage than capturing buildings. A position needs protection until its control timer finishes, and points can scatter when that position changes hands. The official Kingshot Wiki divides the map into scoring buildings, bonus buildings, gathering spots and safe zones. Decide who holds each objective and who can move to help before everyone converges on the centre.
Before battle, check the event time and your legion, then have your commander confirm who can attend. The official wiki describes voting and registration as separate stages; members submit battle requests for the appropriate legion. Attendance and the opposing alliance’s strength affect what your team can actually hold, so treat the following roles as a starting point for discussion.
At the opening, available members can split between a nearby Sanctum, an Abbey and useful bonus buildings. A building starts generating ongoing points only after full control, and the first full capture awards a one-time bonus. Entering it is not the same as securing it. The Bell Tower shortens the control countdown; the Stables reduce the free-teleport cooldown. One helps a team capture or retake objectives, while the other makes repeated movement easier. Which comes first depends on enemy positions and whether your alliance can defend it.
In an original strategy discussion, player darkwizard42 described assigning two support players per building. A supporter holds an assigned objective and, when able, reinforces a teammate or another building. The alliance keeps mobile attackers available to rally where opponents concentrate or reinforce a building under attack. The author said the approach worked when attendance and high-power opponents were fairly even. With fewer available players, contest fewer objectives so that each has enough support.
The official wiki ranks Swordshrine, Sanctum and Abbey in descending order for ongoing score. The central Swordshrine starts locked and, once controlled, faces mercenary attacks. Before sending everyone to the centre, check who can reinforce the position. If the opponent concentrates there, watch the flanks for buildings your team can retake. A high-scoring objective is valuable only if your alliance can support the defence.
When control changes, some accumulated alliance points become supplies on the ground, available to either side. Darkwizard42’s alliance prepares to collect them when a building is about to fall or be captured. This is a useful job for a nearby mobile player, not just the strongest attacker. Plan both the garrison and the collection: taking a building is only part of protecting the score already accumulated.
Injured troops leave fewer soldiers available to reinforce. In a reply, darkwizard42 explained that the alliance rotates secondary attackers when their teleports or troops run low, giving the front line time to recover. The official wiki also describes reinforcing allies and joining rallies from the safe zone. Tell the commander before withdrawing or healing, and arrange cover so an important position is not left unsupported.
This concerns Kingshot’s Swordland Showdown, a different question from the Swordland Summit League schedule. The player’s original post does not identify a kingdom or exact version. The official wiki map and creator 哈啦呼’s November 1 K614 legion recording provide context, but kingdom progression, attendance and future updates can change the best plan.